Tutorial: How to Add Self-hosted Comments to Your Static Site

Monica Lent published
I've been writing code for over 20 years (I can't believe it either), but it still took me over five hours and four tutorials to finally get working, good-looking comments installed on this very blog.
Piecing together information from a bunch of places was quite tedious, so I'm compiling everything I learned together into this one article.
The end result is a free, self-hosted comments system for static websites, based on the open-source project Commento.
You can use Commento for Gatsby comments, Hugo comments, or static site comments regardless of the framework you're using. It's a great Disqus alternative, and even allows you to import existing comments from Disqus.
A big reason I did not use something like Netlify Comments is because I did not want to re-build my website for each comment. Commento also allows me to easily add comments to blogs that aren't deployed on Netlify, so I can use one system for websites running on different hosts.
To save time, you can also just paid $99/year per website for Commento and have them do it for you. I run several static sites with blogs, so that's the main reason I didn't just go for the hosted version for this JavaScript-rendered blog.
The tech stack I'm using is as follows:
- Digital Ocean — or any other cloud provider
- Netlify DNS — or any DNS provider
- Nginx running on Ubuntu — to serve the comments system
- Let's Encrypt — for the SSL cert
- Commento with Postgres — for comments
- Systemd — to start/persist the process and set environment variables
- Gatsby — or any other static site generator
- Social integrations — GitHub and Twitter
- Mailgun — for email notifications for you and commentors
Yeah, it's wild how many moving parts are required to get this done, but we are going to go through each of these pieces step-by-step so you can set up self-hosted comments, as well as all the troubleshooting I did in order to make it run.
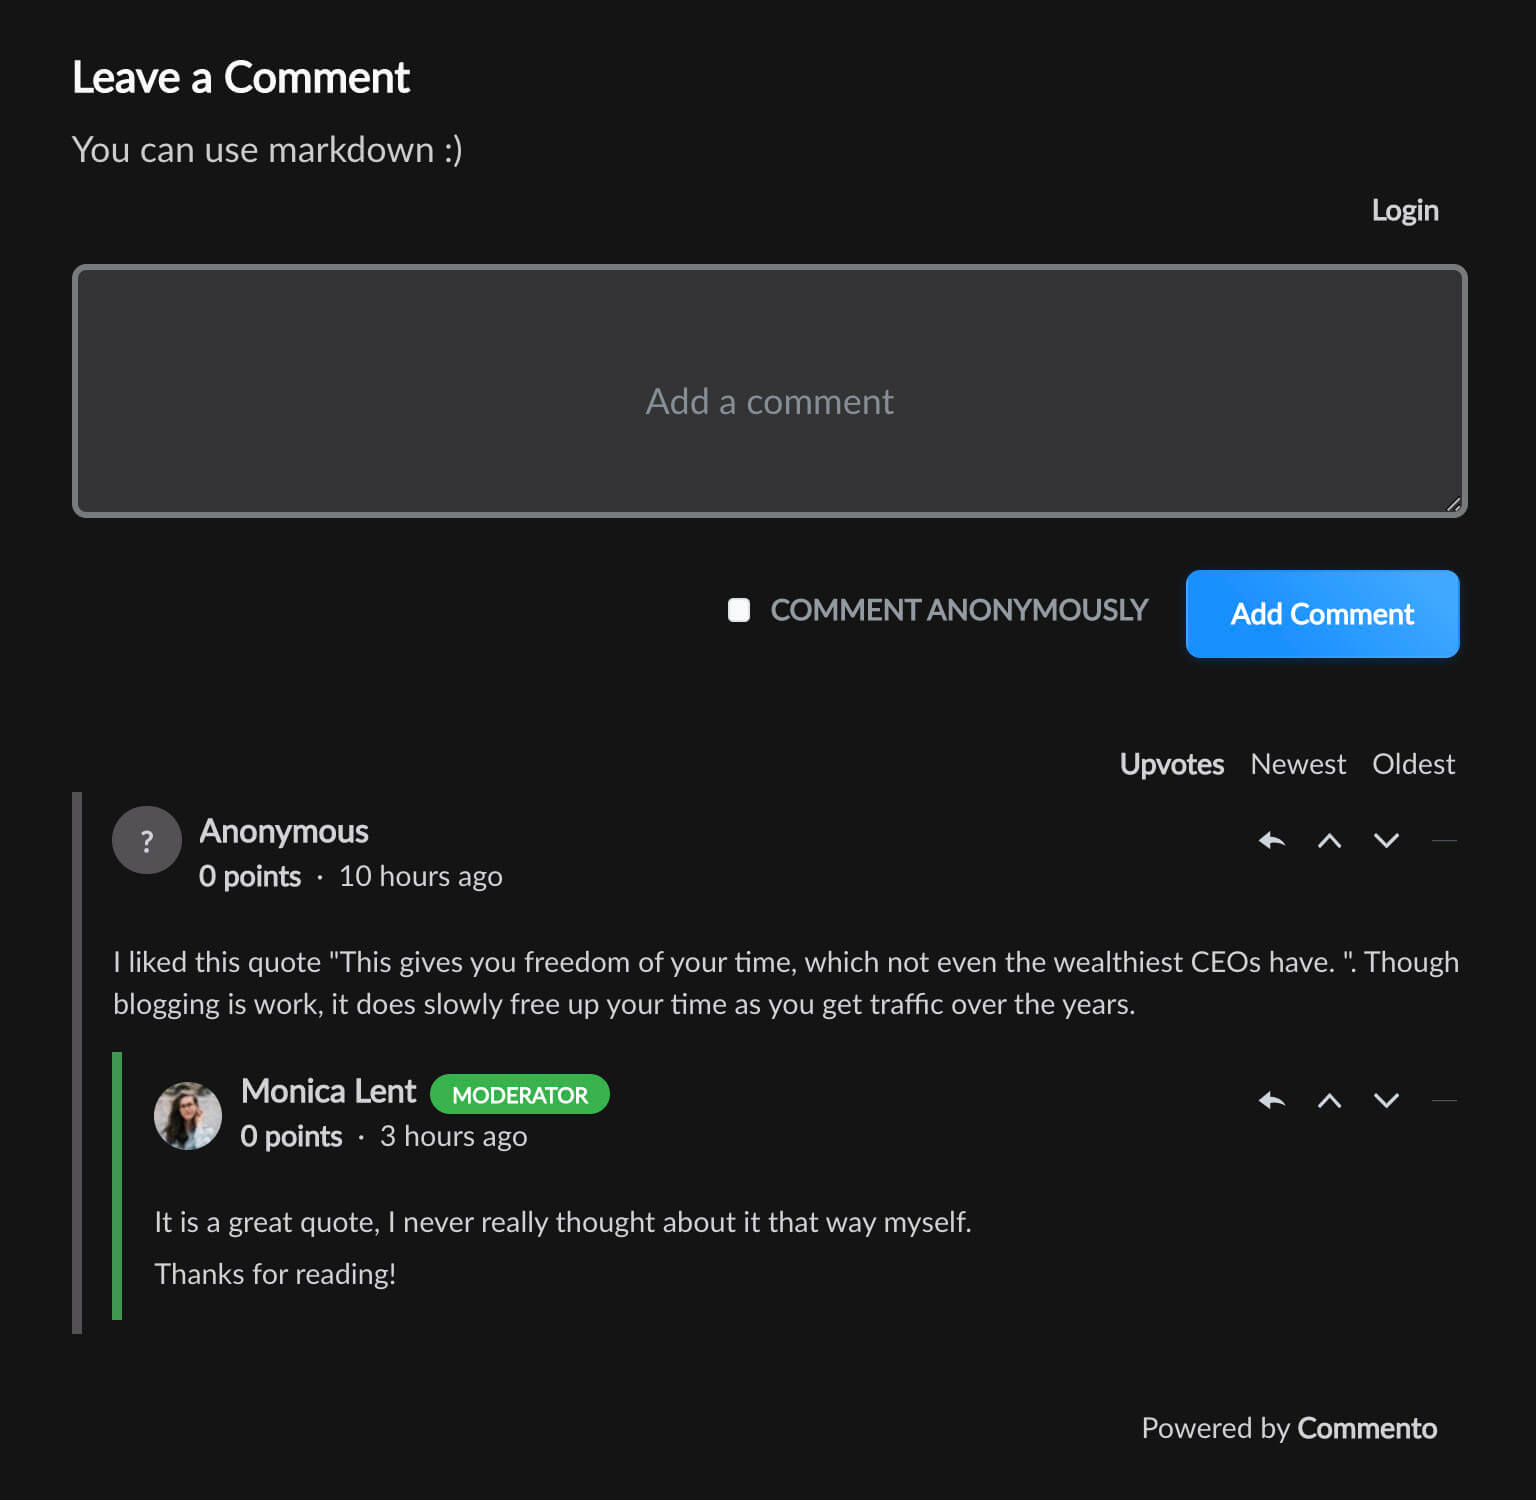
Here's what the end result looks like (after I customized the CSS):
Commento: Pros and Cons
Pros:
- Fast, lightweight, no ads or tracking (making it a great Disqus alternative)
- CSS doesn't require too much tweaking to look good
- It's written in Golang, so 99% of the work is handled by a single binary
- You can import existing Disqus comments
- You can add as many domains as you want to the same Commento instance
Cons:
- Anonymous comments don't allow someone to provide their name/website
- There is no admin panel of all comments, so you need to approve comments on individual articles
- Bugs and quirks: At time of writing, Twitter-login profile images don't work and I have some quirky workarounds to handle issues with the templating language not evaluating consistently
- You need to manually edit some minified JavaScript to have proper
nofollowlinks
Tips:
- If you run multiple websites, install this on a neutral domain/subdomain where you won't mind including a script from that origin on your other sites.
How to add comments to your static site or blog
Here are the steps we'll go through on this journey together. Many of them can be done in a different order and chances are you'll jump around a bit while you get things running.
- Create the server where you'll install Commento
- Set up DNS records
- Set up postgres and commento postgres user
- Download the latest Commento release
- Set up the environment variables with systemd
- Add an Nginx configuration for your new subdomain
- Set up an SSL certificate with Let's Encrypt
- Create your admin account, then disable account creation
- Embed comments on your website
- Edit JavaScript to manually nofollow links
- Configure Mailgun
- Add social login: GitHub
- Add social login: Twitter
- Customize CSS and other settings
Only 14 steps, what could go wrong? 😏 Hopefully less for you than for me! Let's do it.
Create the server where you'll install Commento
In this example, I'm using Digital Ocean but you can use any other option like Rackspace, AWS, GCP, Linode, literally anywhere that lets you run a virtual machine in the cloud.
I'm running Ubuntu in this example. Your Linux distro doesn't matter too much, but if you want to use the Commento binary instead of compiling from source, you'll want to use something they're currently building.
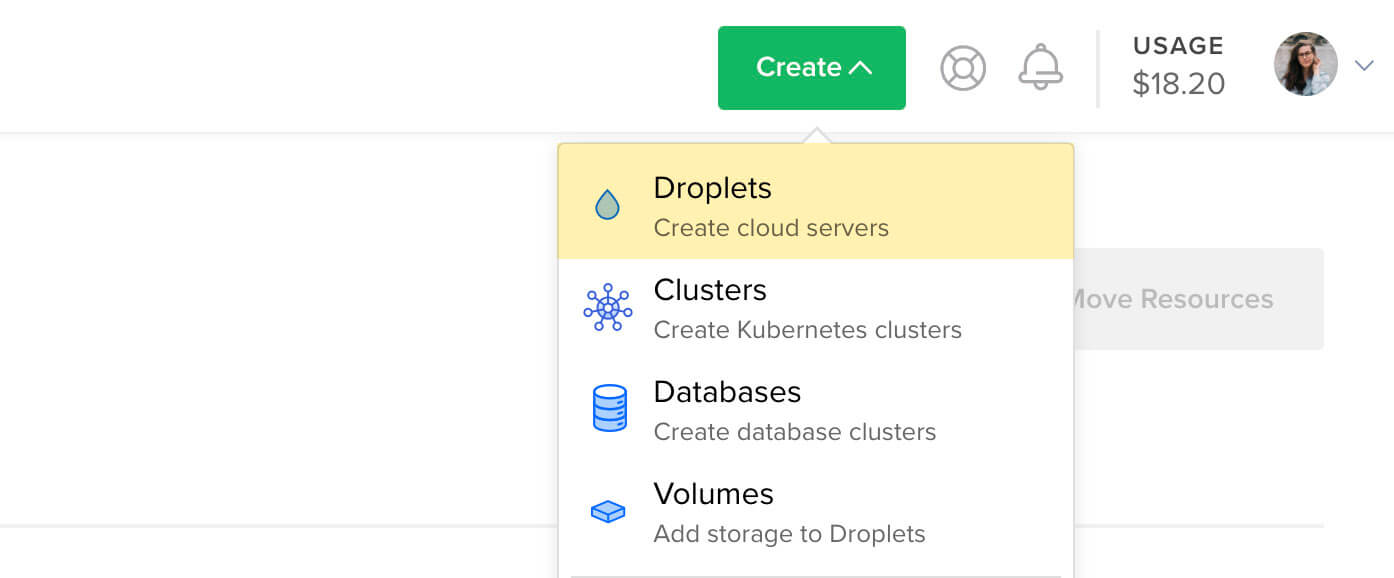
Choose or create a project, then create a new Droplet using the "Create" dropdown menu.
If you're familiar with working with VMs, you won't need much of an explanation here. Otherwise, you can read this tutorial about how to create your first droplet.
My settings are:
- Distribution: Ubuntu
- Plan: Shared CPU, $5/mo
- Data Center: Frankfurt
- VPC Network: None
- Additional Options: None
- Authentication: SSH Keys
After the droplet has been created, snag the IP address and create a DNS record.
Set up DNS records
I bought my domain name through Namecheap, but the DNS is managed by Netlify.
It doesn't matter which provider you use, you need to create an A Record that points to your server's IP address.
The name should point to the domain or subdomain that you want to run Commento on.

We will return to our DNS records later to add records that let us send comment notifications from our domain, but in the meantime, we will log into our server and install postgres and commento.
Optional: Create an SSH alias for your new droplet
Open ~/.ssh/config and give your droplet an alias so it's easier to ssh into later:
Host comments
HostName YOUR_IP_ADDRESS
User YOUR_USER
If you're doing this for the first time, YOUR_USER is root and the HostName is the IP address. You may
want to add a new user on Ubuntu.
Set up postgres and commento postgres user
Now it's time to install postgres on your Ubuntu server.
sudo apt update
sudo apt install postgresql postgresql-contrib
Then, switch users to being the postgres user and enter the postgres shell.
sudo -i -u postgres
Now we are going to create a commento role and a commento database, which the commento role owns.
This data will go into a configuration file soon, so keep the password for the commento role handy somewhere.
createuser commento --pwprompt
createdb commento -O commento
You can also do this inside the postgres shell if you wanted to, the following commands are equivalent:
CREATE ROLE commento WITH LOGIN;
\password commento
CREATE DATABASE commento OWNER commento;
Now, to see this has all worked properly, open the postgres shell:
psql
You can use \l to list the tables, and you should see your new database:
postgres=# \l
                              List of databases
   Name    |  Owner   | Encoding | Collate |  Ctype  |   Access privileges
-----------+----------+----------+---------+---------+-----------------------
 commento  | commento | UTF8     | C.UTF-8 | C.UTF-8 |
 postgres  | postgres | UTF8     | C.UTF-8 | C.UTF-8 |
 template0 | postgres | UTF8     | C.UTF-8 | C.UTF-8 | =c/postgres          +
           |          |          |         |         | postgres=CTc/postgres
 template1 | postgres | UTF8     | C.UTF-8 | C.UTF-8 | =c/postgres          +
           |          |          |         |         | postgres=CTc/postgres
If you need to reset the password in the future, you can use ALTER USER commento WITH PASSWORD 'your new password';.
To exit the postgres shell, hit Ctrl + d or type exit.
Download the latest Commento release
Open the Release page for Commento and copy the URL for the latest release binary:
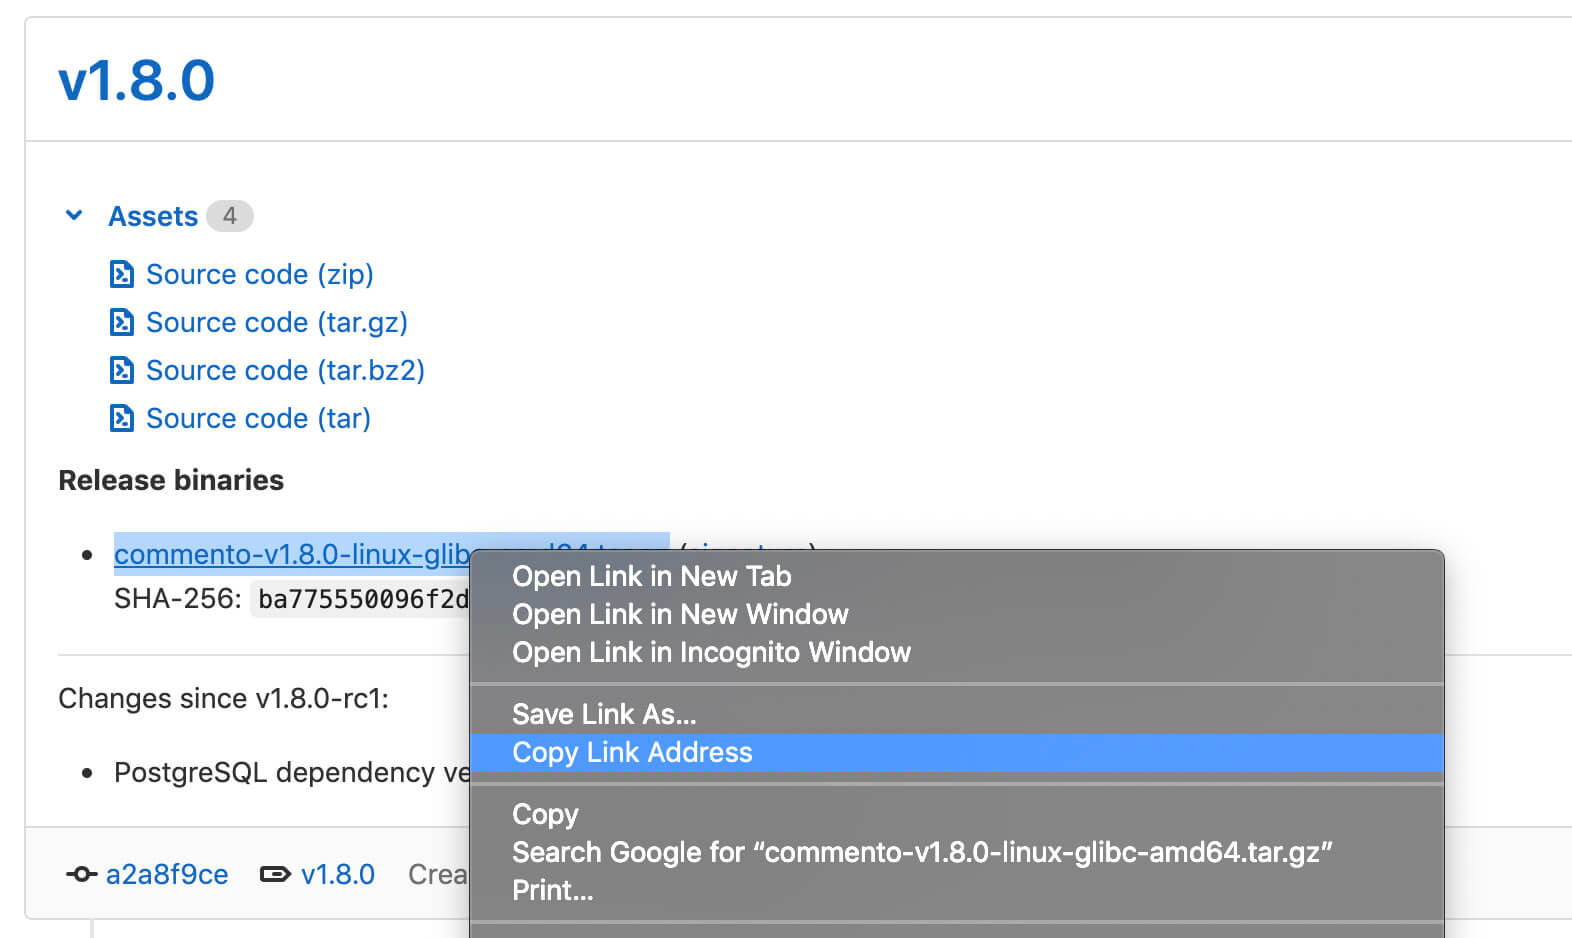
We're going to download this, and then unzip it to a directory of our chosing (I use /opt/commento):
mkdir /opt/commento
wget https://dl.commento.io/release/commento-v1.8.0-linux-glibc-amd64.tar.gz
tar xvf commento-v1.8.0-linux-glibc-amd64.tar.gz -C /opt/commento
You should see all the files you need after running ls -laF /opt/commento/:
total 21532
drwxr-xr-x 8 youruser youruser     4096 Jul 27 12:55 ./
drwxr-xr-x 4 youruser youruser     4096 Jul 27 12:05 ../
-rwxr-xr-x 1 youruser youruser 14131460 Apr 10 21:55 commento*
-rw-r--r-- 1 youruser youruser  7812556 Apr 11 16:39 commento-v1.8.0-linux-glibc-amd64.tar.gz
-rw-r--r-- 1 youruser youruser      868 Apr 10 21:55 confirm-email.html
drwxr-xr-x 2 youruser youruser     4096 Apr 10 21:55 css/
-rw-r--r-- 1 youruser youruser    21029 Apr 10 21:55 dashboard.html
drwxr-xr-x 2 youruser youruser     4096 Apr 10 21:55 db/
drwxr-xr-x 2 youruser youruser     4096 Apr 10 21:55 fonts/
-rw-r--r-- 1 youruser youruser      757 Apr 10 21:55 footer.html
-rw-r--r-- 1 youruser youruser     1229 Apr 10 21:55 forgot.html
drwxr-xr-x 2 youruser youruser     4096 Apr 10 21:55 images/
drwxr-xr-x 2 youruser youruser     4096 Jul 27 17:09 js/
-rw-r--r-- 1 youruser youruser     1574 Apr 10 21:55 login.html
-rw-r--r-- 1 youruser youruser      188 Apr 10 21:55 logout.html
-rw-r--r-- 1 youruser youruser     2243 Apr 10 21:55 profile.html
-rw-r--r-- 1 youruser youruser     1269 Apr 10 21:55 reset.html
-rw-r--r-- 1 youruser youruser     2748 Apr 10 21:55 settings.html
-rw-r--r-- 1 youruser youruser     1785 Apr 10 21:55 signup.html
drwxr-xr-x 2 youruser youruser     4096 Apr 10 21:55 templates/
-rw-r--r-- 1 youruser youruser     1747 Apr 10 21:55 unsubscribe.html
Perfect, now we are going to tell Commento to authenticate with Postgres using the commento role we created earlier.
Set up the environment variables with systemd
Create a service file:
sudo vim /etc/systemd/system/commento.service
Paste this into it to start:
[Unit]
Description=Commento daemon service
After=network.target postgresql.service

[Service]
Type=simple
ExecStart=/opt/commento/commento
Environment=COMMENTO_ORIGIN=https://comments.YOUR_DOMAIN_NAME.com
Environment=COMMENTO_PORT=8081
Environment=COMMENTO_POSTGRES=postgres://commento:YOUR_COMMENTO_USER_PASSWORD@127.0.0.1:5432/commento?sslmode=disable

# Uncomment after creating your commento admin account
# Environment=COMMENTO_FORBID_NEW_OWNERS=true

[Install]
WantedBy=multi-user.target
Replace YOUR_DOMAIN_NAME and YOUR_COMMENTO_USER_PASSWORD with the appropriate values.
Next we will start this process and commento will be running, but not yet exposed through Nginx.
sudo chmod 644 /etc/systemd/system/commento.service
sudo systemctl start commento
sudo systemctl enable commento
IMPORTANT AGAIN — Anytime you change a static file, you need to stop and re-start via systemctl. Otherwise the files are cached and you won't see your changes. I wasted a lot of time on this.
Add an Nginx configuration for your new subdomain
I'm not going to go through setting up Nginx for the first time because that would take a long time, but here is a tutorial on how to do it.
Open /etc/nginx/sites-available/commento and paste this code to start:
server {
    server_name comments.YOUR_DOMAIN_NAME.com;

    location / {
        proxy_set_header Host $http_host;
        proxy_set_header X-Forwarded-For $proxy_add_x_forwarded_for;
        proxy_set_header X-Forwarded-Proto $scheme;
        proxy_set_header X-Real-IP $remote_addr;
        proxy_pass http://localhost:8081;
    }
}
Again, replacing YOUR_DOMAIN_NAME with your actual domain. Then make a symbolic link between the sites available and those enabled:
ln -s /etc/nginx/sites-available/commento /etc/nginx/sites-enabled/commento
Then, you can test and restart nginx.
nginx -t
service nginx restart
Set up an SSL certificate with Let's Encrypt
Again, if you haven't used Certbot before, here is a guide for setting it up for the first time. Here's the basics:
sudo add-apt-repository ppa:certbot/certbot
sudo apt install python-certbot-nginx
Now, we'll run certbot and it's going to find our Nginx configurations and offer to generate certificates for us:
certbot
Saving debug log to /var/log/letsencrypt/letsencrypt.log
Plugins selected: Authenticator nginx, Installer nginx

Which names would you like to activate HTTPS for?
- - - - - - - - - - - - - - - - - - - - - - - - - - - - - - - - - - - - - - - -
1: comments.bloggingfordevs.com
- - - - - - - - - - - - - - - - - - - - - - - - - - - - - - - - - - - - - - - -
Select the appropriate numbers separated by commas and/or spaces, or leave input
blank to select all options shown (Enter 'c' to cancel): 1
Obtaining a new certificate
Performing the following challenges:
http-01 challenge for comments.bloggingfordevs.com
Waiting for verification...
Cleaning up challenges
Deploying Certificate to VirtualHost /etc/nginx/sites-enabled/commento

Please choose whether or not to redirect HTTP traffic to HTTPS, removing HTTP access.
- - - - - - - - - - - - - - - - - - - - - - - - - - - - - - - - - - - - - - - -
1: No redirect - Make no further changes to the webserver configuration.
2: Redirect - Make all requests redirect to secure HTTPS access. Choose this for
new sites, or if you're confident your site works on HTTPS. You can undo this
change by editing your web server's configuration.
- - - - - - - - - - - - - - - - - - - - - - - - - - - - - - - - - - - - - - - -
Select the appropriate number [1-2] then [enter] (press 'c' to cancel): 2
If it everything has worked so far, you should be able to open up Commento in your browser at the subdomain you setup earlier with your DNS provider!
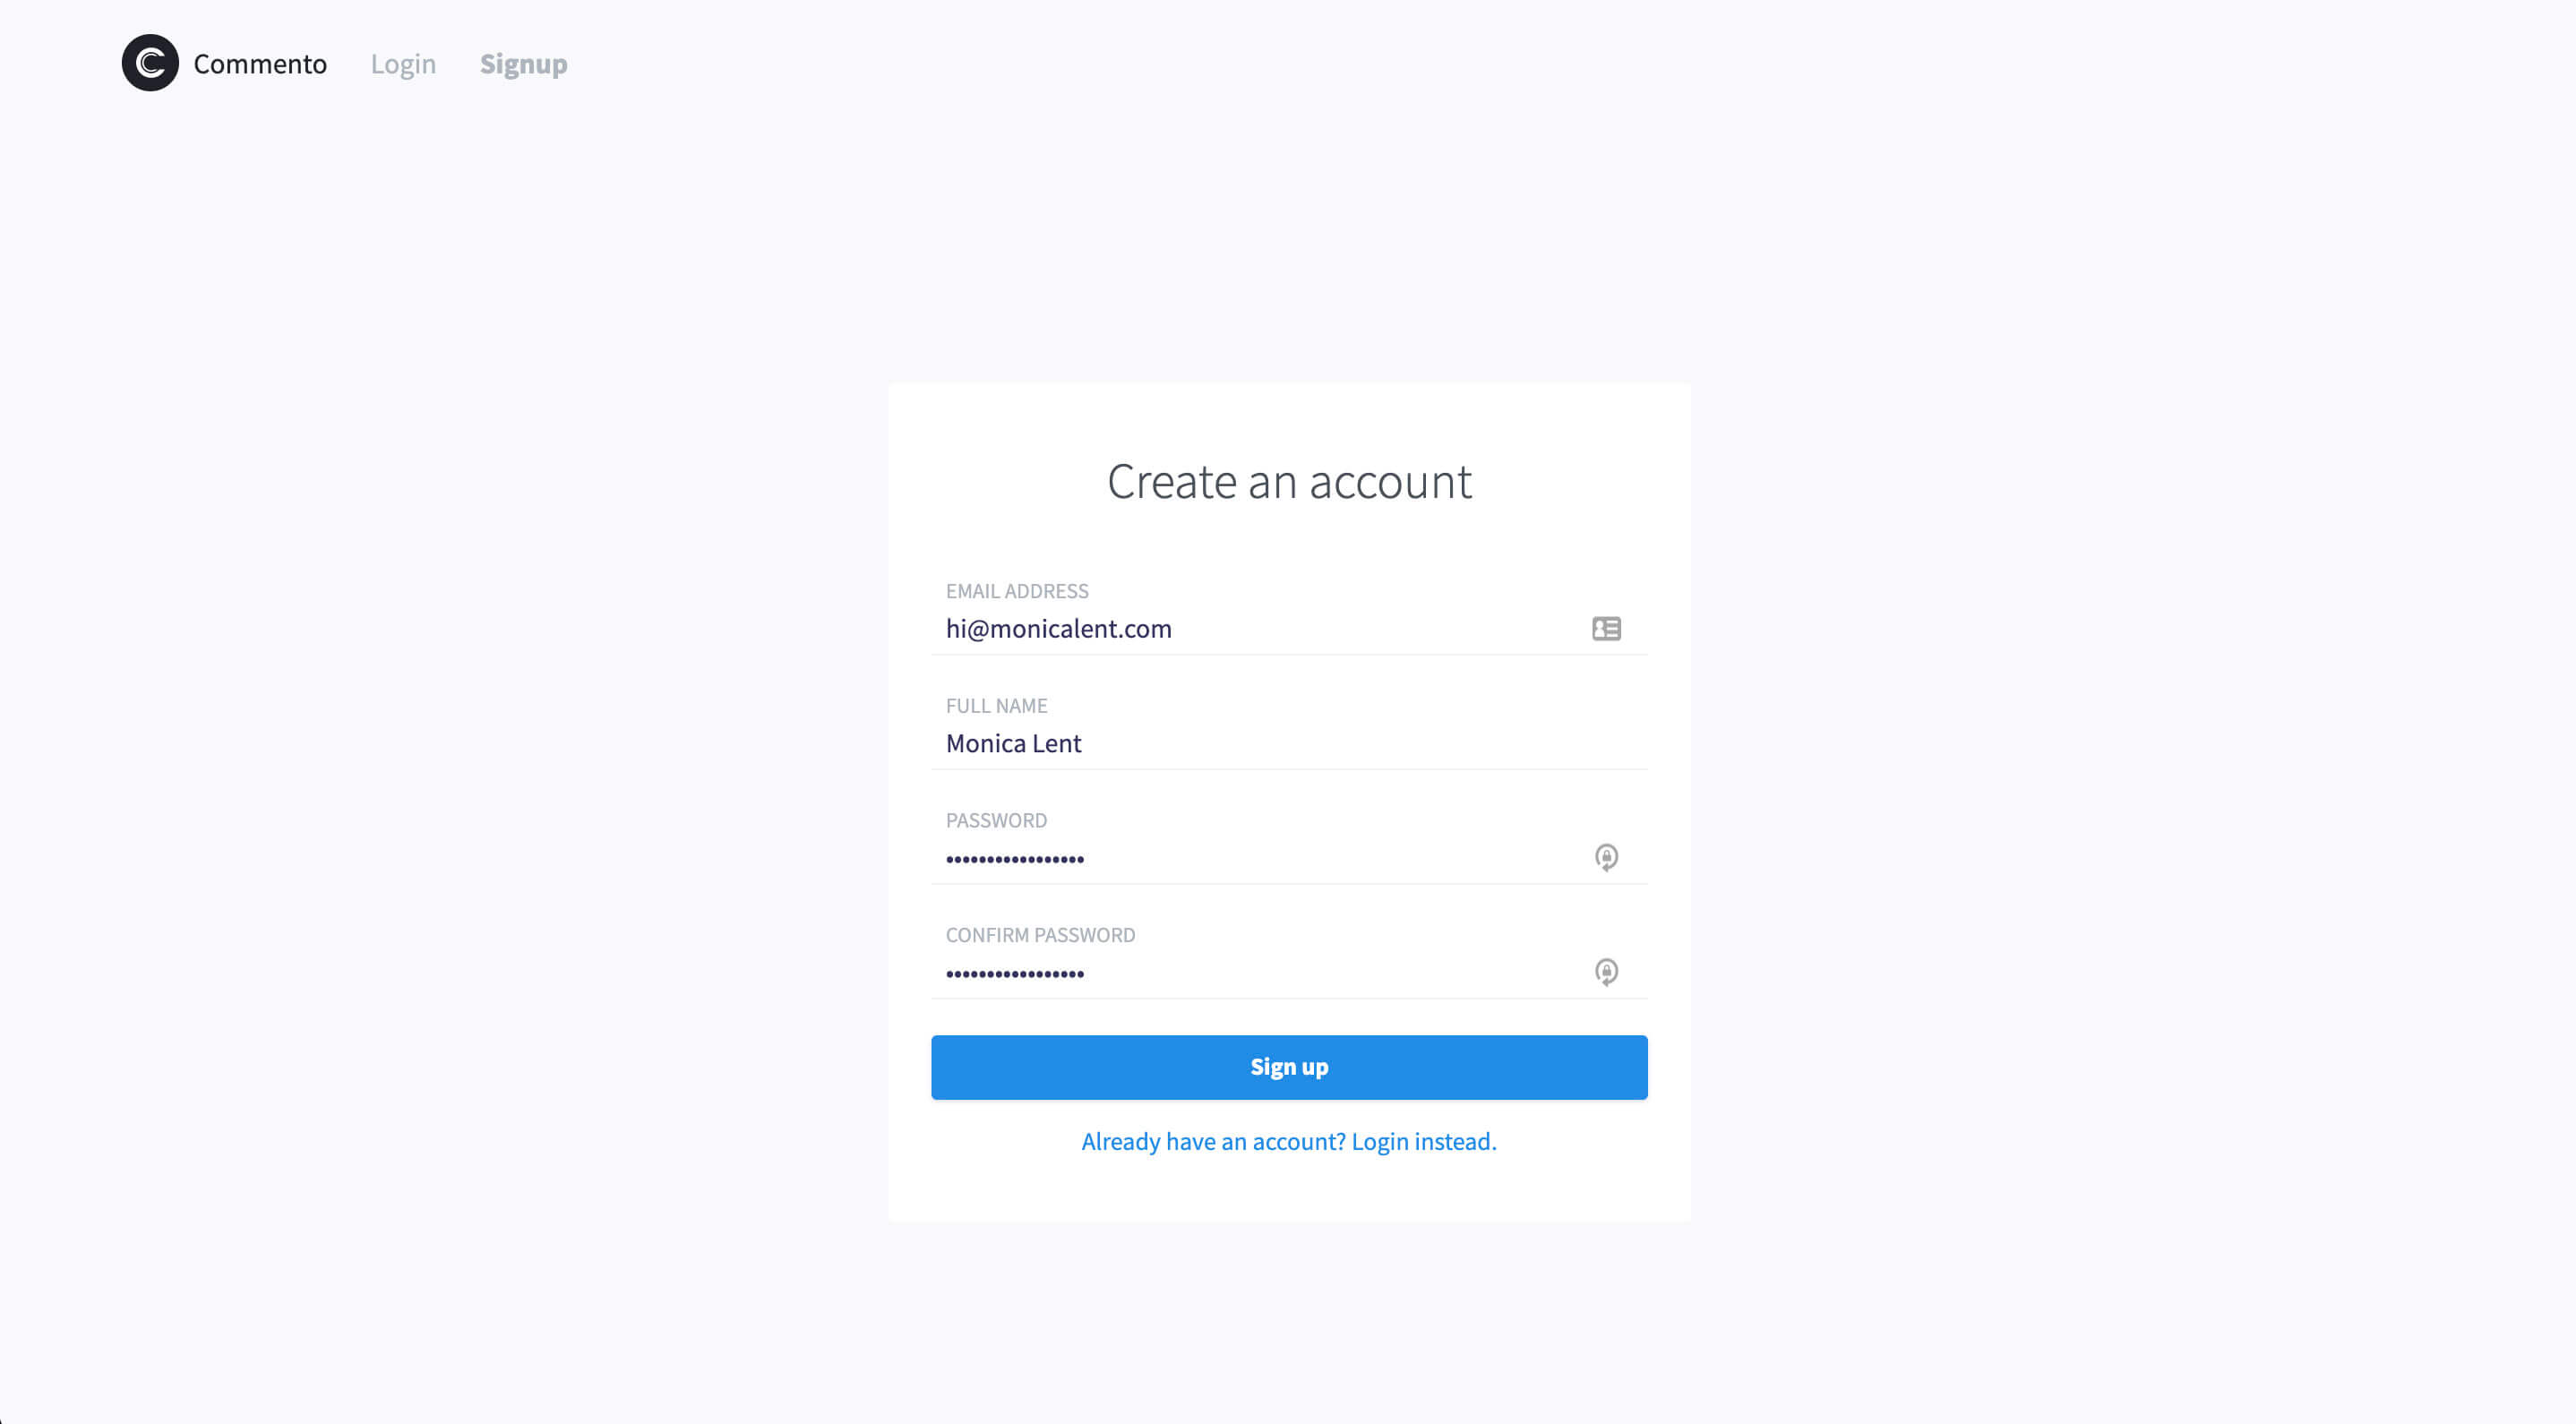
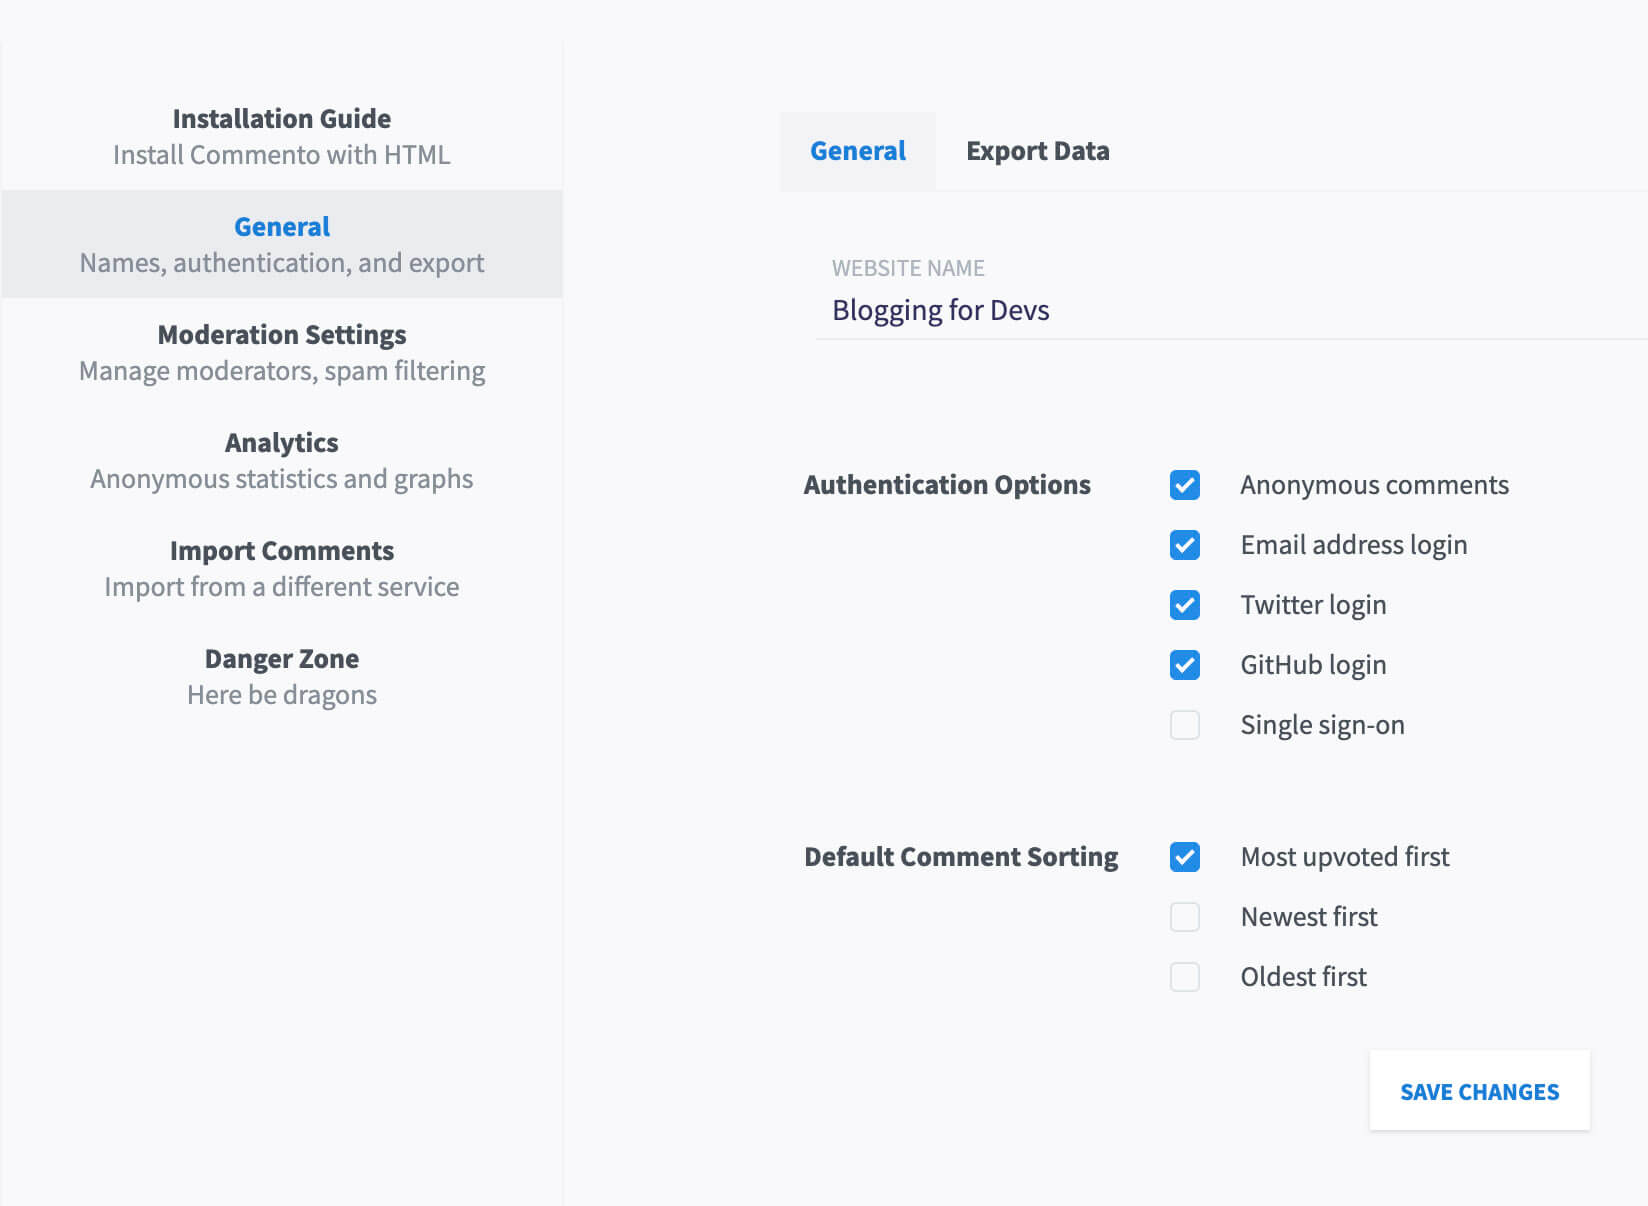
Create your admin account, then disable account creation
Create your admin account using the email address where you want to get comment notifications and use to log in to your comments on your website.
TIP: If you try to create a user and you see it cannot POST to something like /api/user/new because
the URL contains [[[.Origin]]], open the JavaScript console and type window.commento.origin = ''.
For some reason, the JavaScript isn't always parsed by the templating system. I've only had this issue when not authenticated though. This variable is properly interpolated after being logged in.
Then go and uncomment the line in /etc/systemd/system/commento.service:
# Uncomment after creating your commento admin account
Environment=COMMENTO_FORBID_NEW_OWNERS=true
Stop and restart the service:
sudo systemctl stop commento
sudo systemctl start commento
The option to create a user won't disappear, but there will be an error forbidding it if you try to do it again.
Embed comments on your website
Start by adding a new website for whatever domain you want to add comments to by clicking "New Domain":
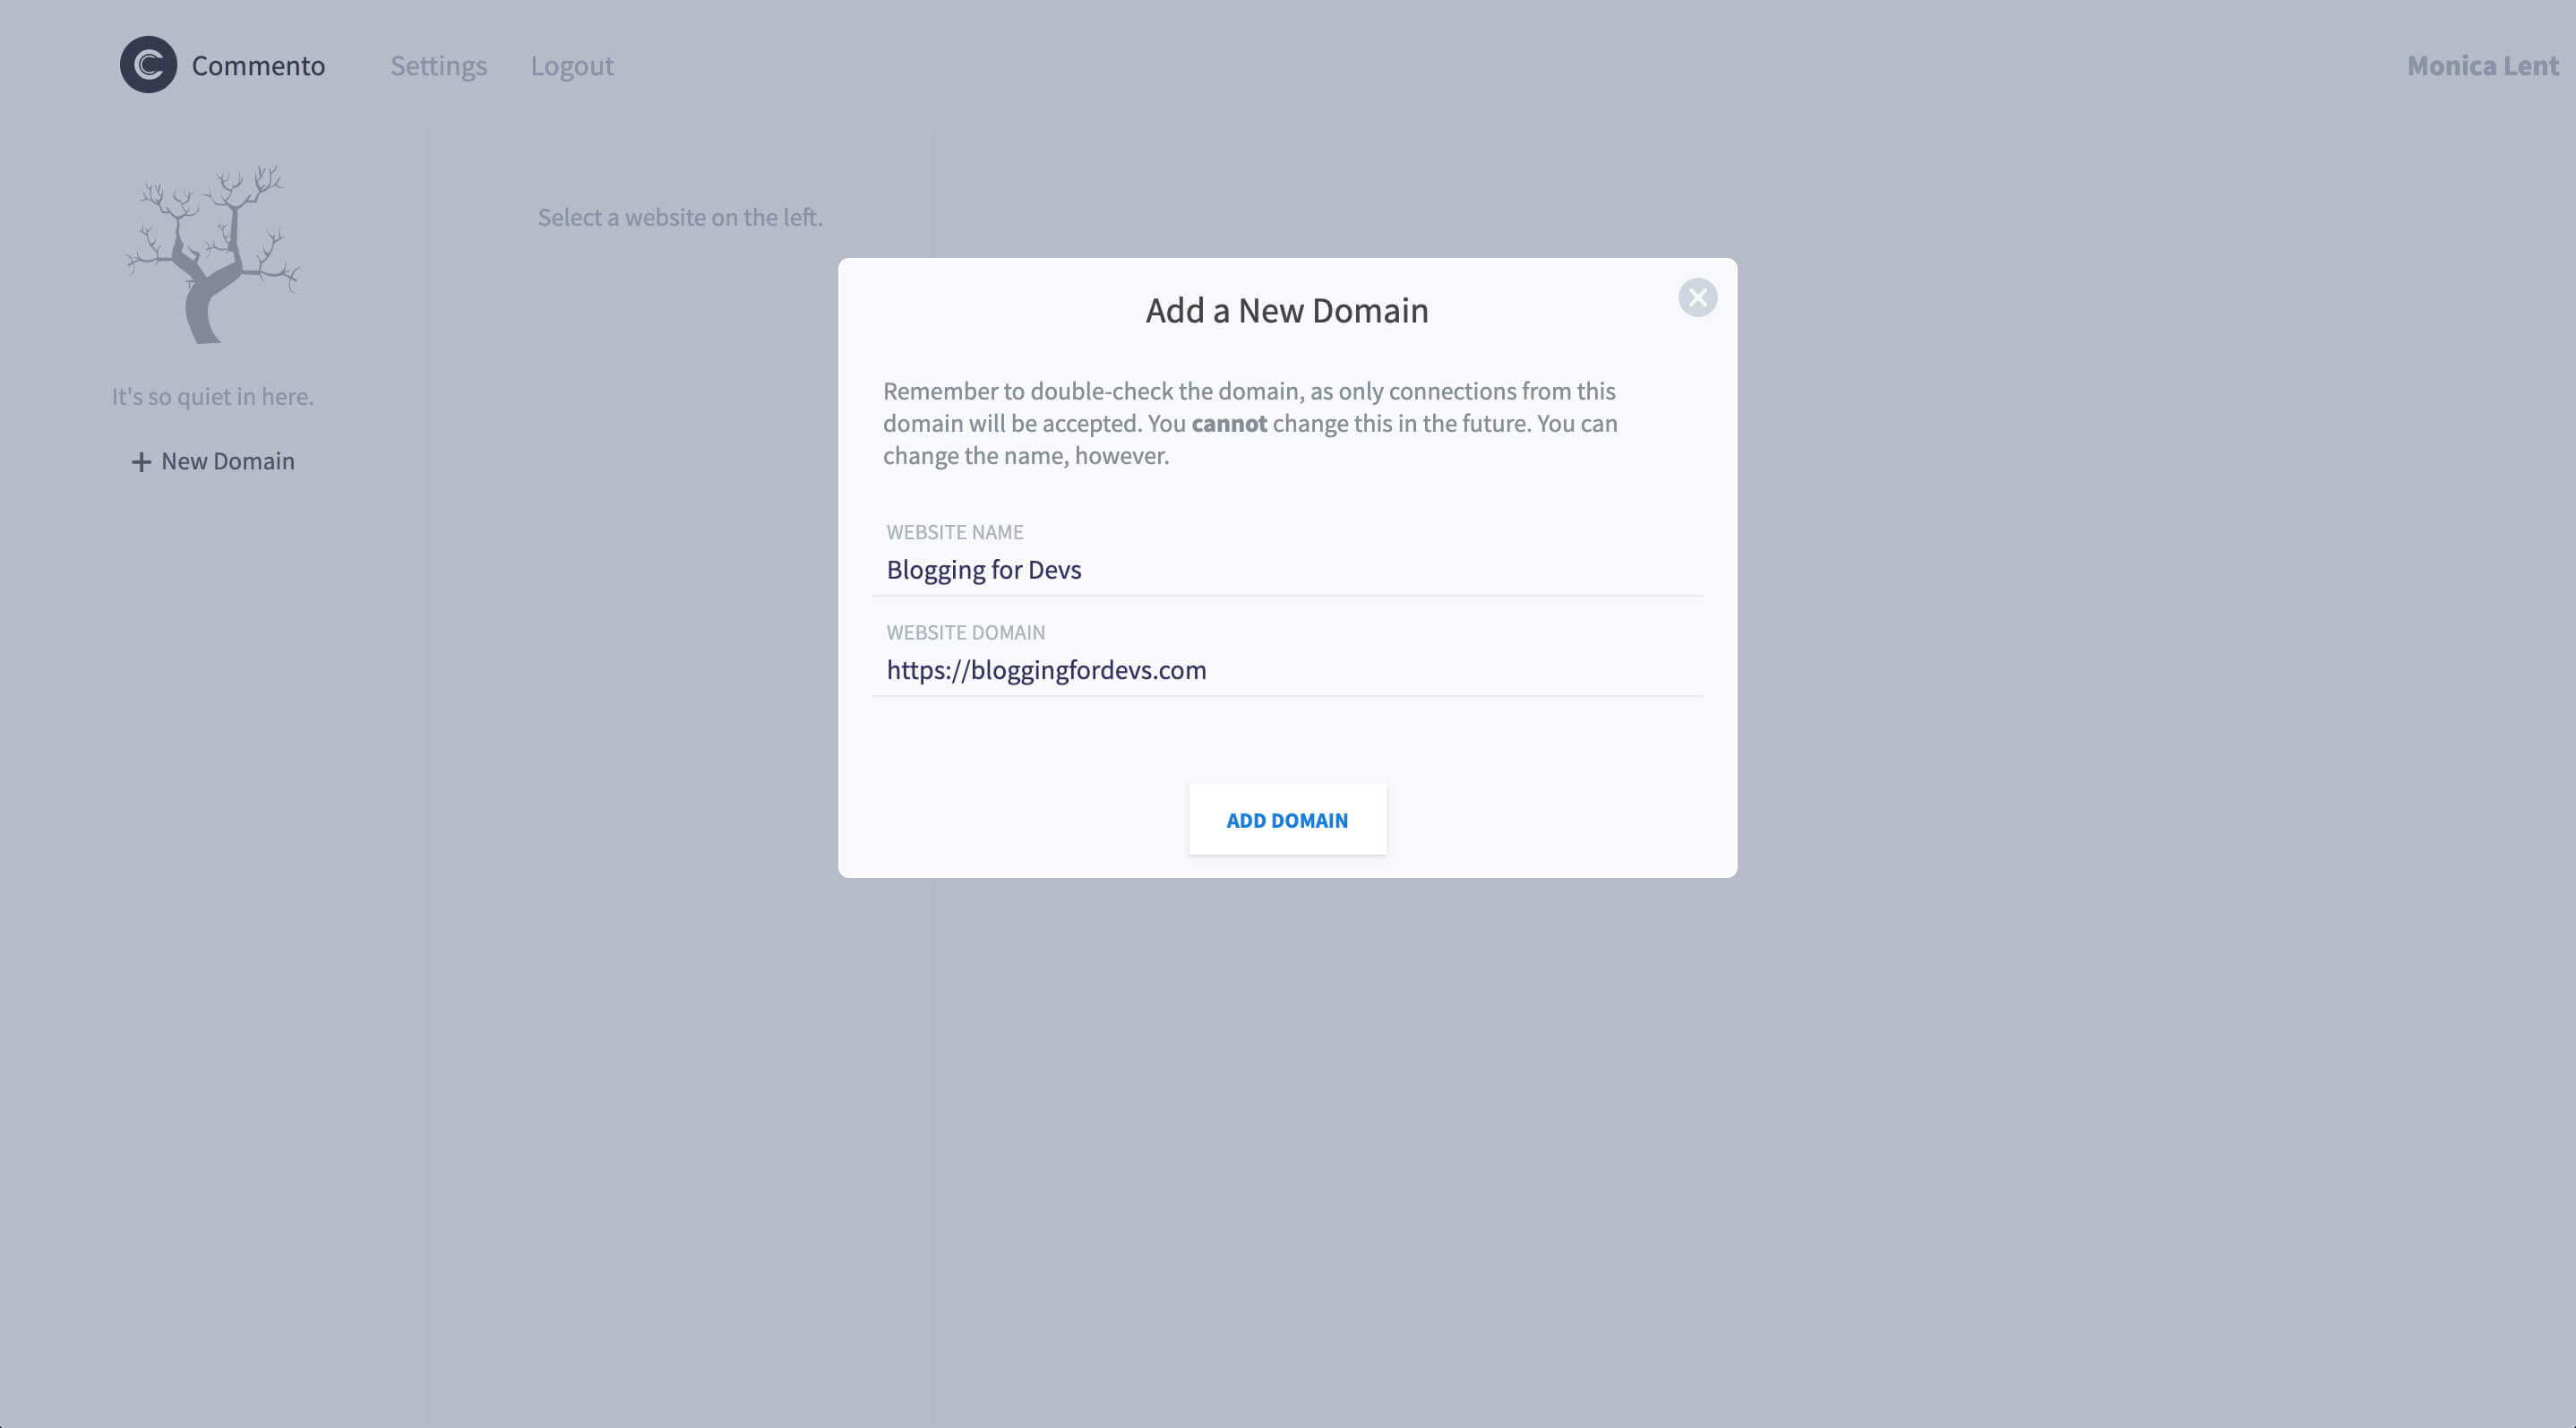
Once you add the domain, you'll see a snippet to install. If you're using something that uses plain HTML and Javascript, for example you want to add comments to Hugo, then using the script as-is will work fine for you.

Otherwise, if you're using something React-based, here's a snippet you can use (it's using TypeScript but just remove the ": type" bits if you need plain JavaScript):
import React, { useEffect } from 'react';

const insertScript = (src: string, id: string, parentElement: HTMLElement) => {
  const script = window.document.createElement('script');
  script.async = true;
  script.src = src;
  script.id = id;
  parentElement.appendChild(script);
  return script;
};

const removeScript = (id: string, parentElement: HTMLElement) => {
  const script = window.document.getElementById(id);
  if (script) {
    parentElement.removeChild(script);
  }
};

const Commento = ({ id }: { id: string }) => {
  useEffect(() => {
    if (!window) {
      return;
    }
    const document = window.document;

    if (document.getElementById('commento')) {
      insertScript(
        `https://comments.YOUR_DOMAIN_NAME.com/js/commento.js`,
        `commento-script`,
        document.body
      );
    }

    return () => removeScript(`commento-script`, document.body);
  }, [id]);

  return <div id="commento" />;
};
Now, you can use the component <Commento id={post.slug} /> or any other unique
value, so that this component is added or removed whenever that value changes.
TIP: It is a pain to run this on localhost based on my limited exposure, so you may need to deploy yout website to see it in action. Locally, you may see something like "This domain is not registered with Commento." which tells you that it is showing up properly.
Edit JavaScript to manually nofollow links
Commento is smart about no-following links embedded inside the comment itself, but there
are two links that are missing the rel="nofollow" attribute:
- The commentor's name
- Comments Powered by Commento
I'm editing the minified JavaScript but you could obviously edit this in the source files itself if you really want to. I'm just lazy and this is efficient — bearing in mind, you will need to re-insert these tweaks if you decide to upgrade.
Open /opt/commento/js/commento.js:
# Make the "Powered by Commento" link nofollow

qe(n,"href","https://commento.io")

# Becomes

qe(n,"href","https://commento.io"),qe(n,"rel","nofollow")

# Make the names nofollow

for(var e=i.getElementsByClassName("commento-name"),o=0;o<e.length;o++)qe(e[o],"style","max-width: "+(e[o].getBoundingClientRect().width+20)+"px;")

# Becomes

for(var e=i.getElementsByClassName("commento-name"),o=0;o<e.length;o++){qe(e[o],'rel','nofollow'),qe(e[o],"style","max-width: "+(e[o].getBoundingClientRect().width+20)+"px;")}
Once you're done editing, stop and restart Commento.
sudo systemctl stop commento
sudo systemctl start commento
If you leave a test comment on your website, you should see that the name and the "Powered by Commento" links
now both have rel="nofollow" on them.
Right now, you should have a fully functioning comment system! Next is email notifications.
Configure Mailgun
Configuring Mailgun isn't really optional because surely you want commentors to be notified when someone responds to their comment. This part was actually easier than expected to set up (especially with how awful email usually is), so don't be afraid :)
Create a new Mailgun account. You'll need to supply a credit card, but they will not charge you (it's an anti-fraud measure).
Go to Sending > Domains and click "Add New Domain".
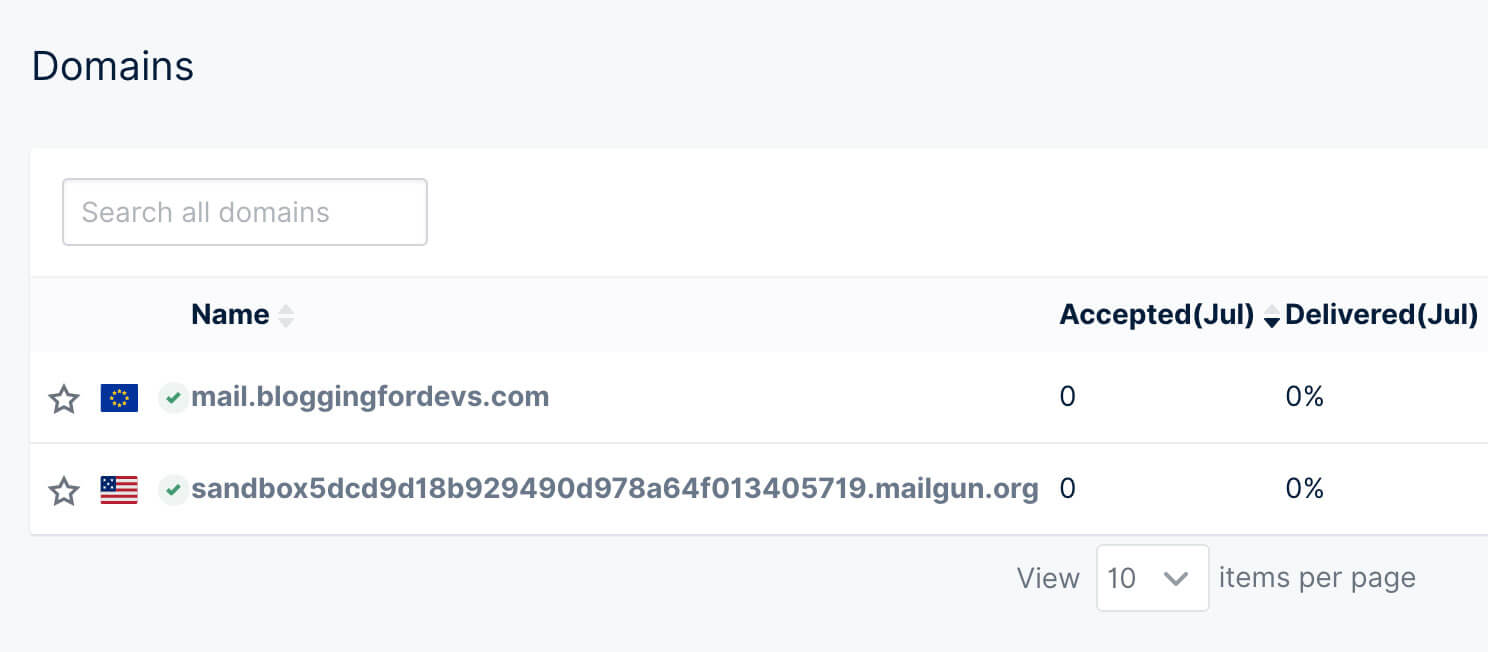
I decided to use the subdomain "mail.bloggingfordevs.com", and just followed their instructions for adding all the DNS records:
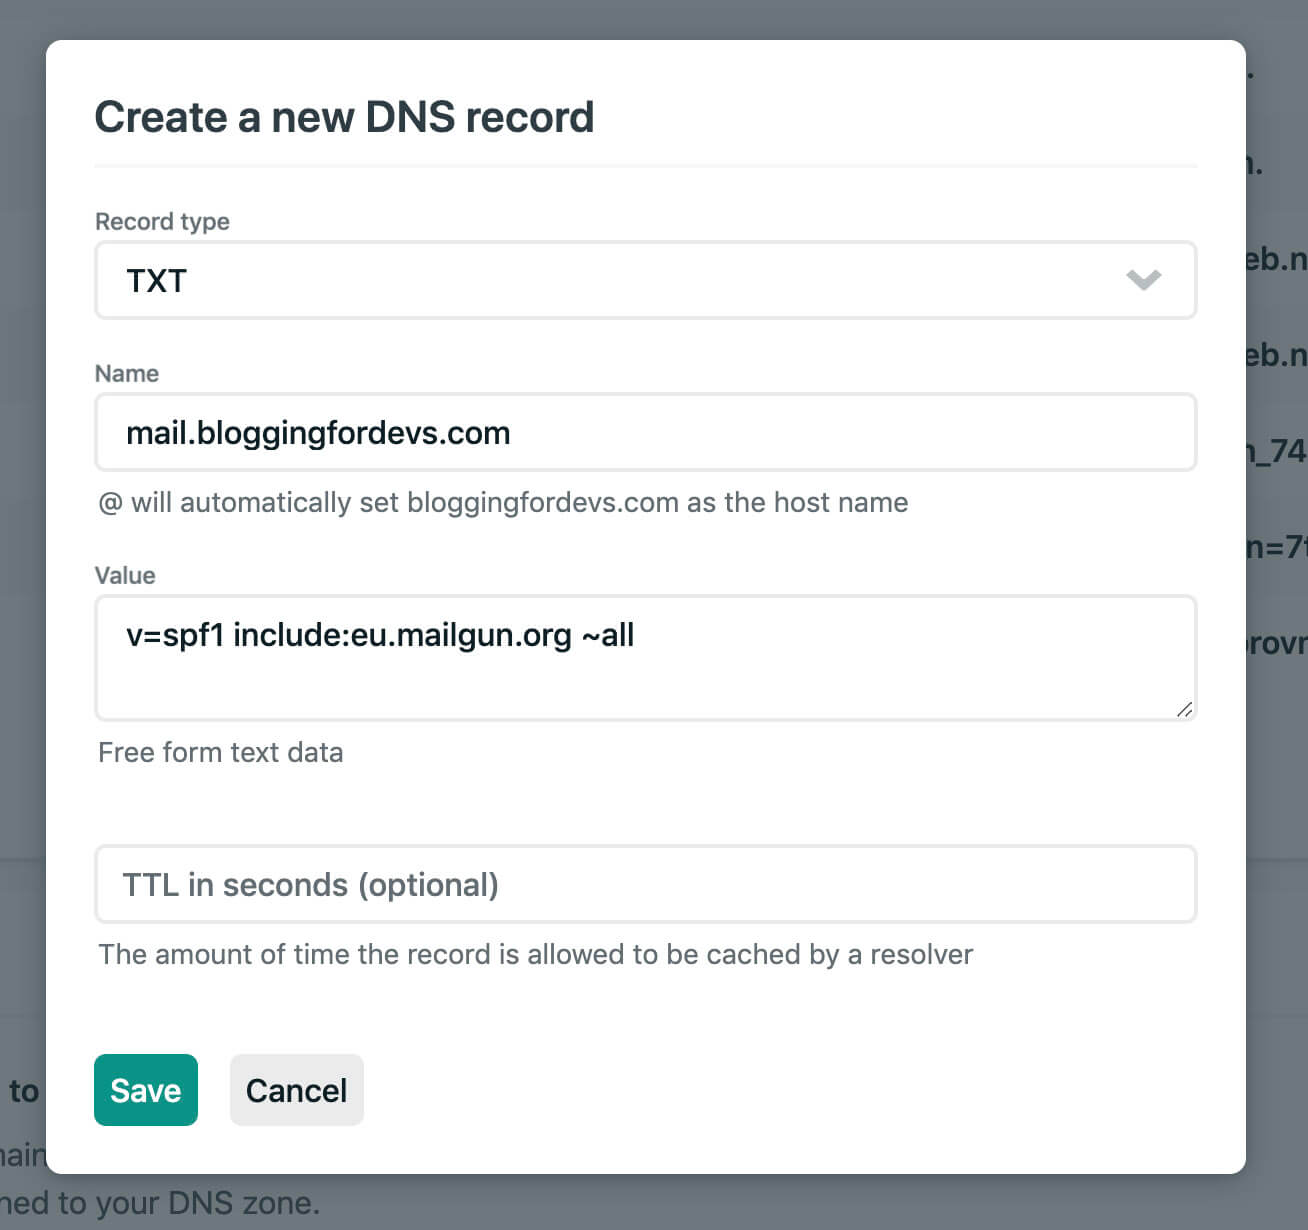
You'll need to add both TXT and MX records. After doing that, verify your DNS setup and you'll see the new domain appear in your list of domains.
Click the domain and choose "SMTP" for your integration. There you will see credentials you can copy and paste into your
service file at /etc/systemd/system/commento.service:
Environment=COMMENTO_SMTP_HOST=smtp.eu.mailgun.org     # Without .eu if you're using a US-based host
Environment=COMMENTO_SMTP_USERNAME=postmaster@YOUR_MAIL_DOMAIN_OR_SUBDOMAIN
Environment=COMMENTO_SMTP_PASSWORD=THE_PASSWORD_VISIBLE_ON_THE_PAGE
Environment=COMMENTO_SMTP_PORT=587
Environment=COMMENTO_SMTP_FROM_ADDRESS=YOUR_EMAIL_ADDRESS
So now the complete file looks like:
[Unit]
Description=Commento daemon service
After=network.target postgresql.service

[Service]
Type=simple
ExecStart=/opt/commento/commento
Environment=COMMENTO_ORIGIN=https://comments.YOUR_DOMAIN_NAME.com
Environment=COMMENTO_PORT=8081
Environment=COMMENTO_POSTGRES=postgres://commento:YOUR_POSTGRES_PASSWORD27.0.0.1:5432/commento?sslmode=disable

# Uncomment after creating your first user on commento.YOURBLOG.com
Environment=COMMENTO_FORBID_NEW_OWNERS=true

Environment=COMMENTO_SMTP_HOST=smtp.eu.mailgun.org
Environment=COMMENTO_SMTP_USERNAME=postmaster@mail.YOUR_DOMAIN_NAME.com
Environment=COMMENTO_SMTP_PASSWORD=YOUR_SMTP_PASSWORD
Environment=COMMENTO_SMTP_PORT=587
Environment=COMMENTO_SMTP_FROM_ADDRESS=YOUR_REPLY_TO_ADDRESS

[Install]
WantedBy=multi-user.target
The email address doesn't need to be you@mail.YOUR_DOMAIN.com. For example, I've set up my DNS
records on mail.bloggingfordevs.com but my FROM_ADDRESS is still hi@bloggingfordevs.com.
Once you're done editing, stop and restart Commento.
sudo systemctl stop commento
sudo systemctl start commento
Then you can try leaving an anonymous comment on the deployed version of your blog and see if you get an email about it :)
Last steps and then we are done...
Add social login: GitHub
Open the GitHub for Developers settings and create a new app.
For the Authorization Callback URL, use:
https://comments.YOUR_DOMAIN_NAME.com/api/oauth/github/callback
Then, open your service file again and add the following variables:
Environment=COMMENTO_GITHUB_KEY=YOUR_CLIENT_ID
Environment=COMMENTO_GITHUB_SECRET=YOUR_CLIENT_SECRET
Replace those values with whatever GitHub gives you as the "Client Id" and "Client Secret" respectively.
Once you're done editing, stop and restart Commento.
sudo systemctl stop commento
sudo systemctl start commento
Once that has worked, you'll see it as an option inside the Admin panel:
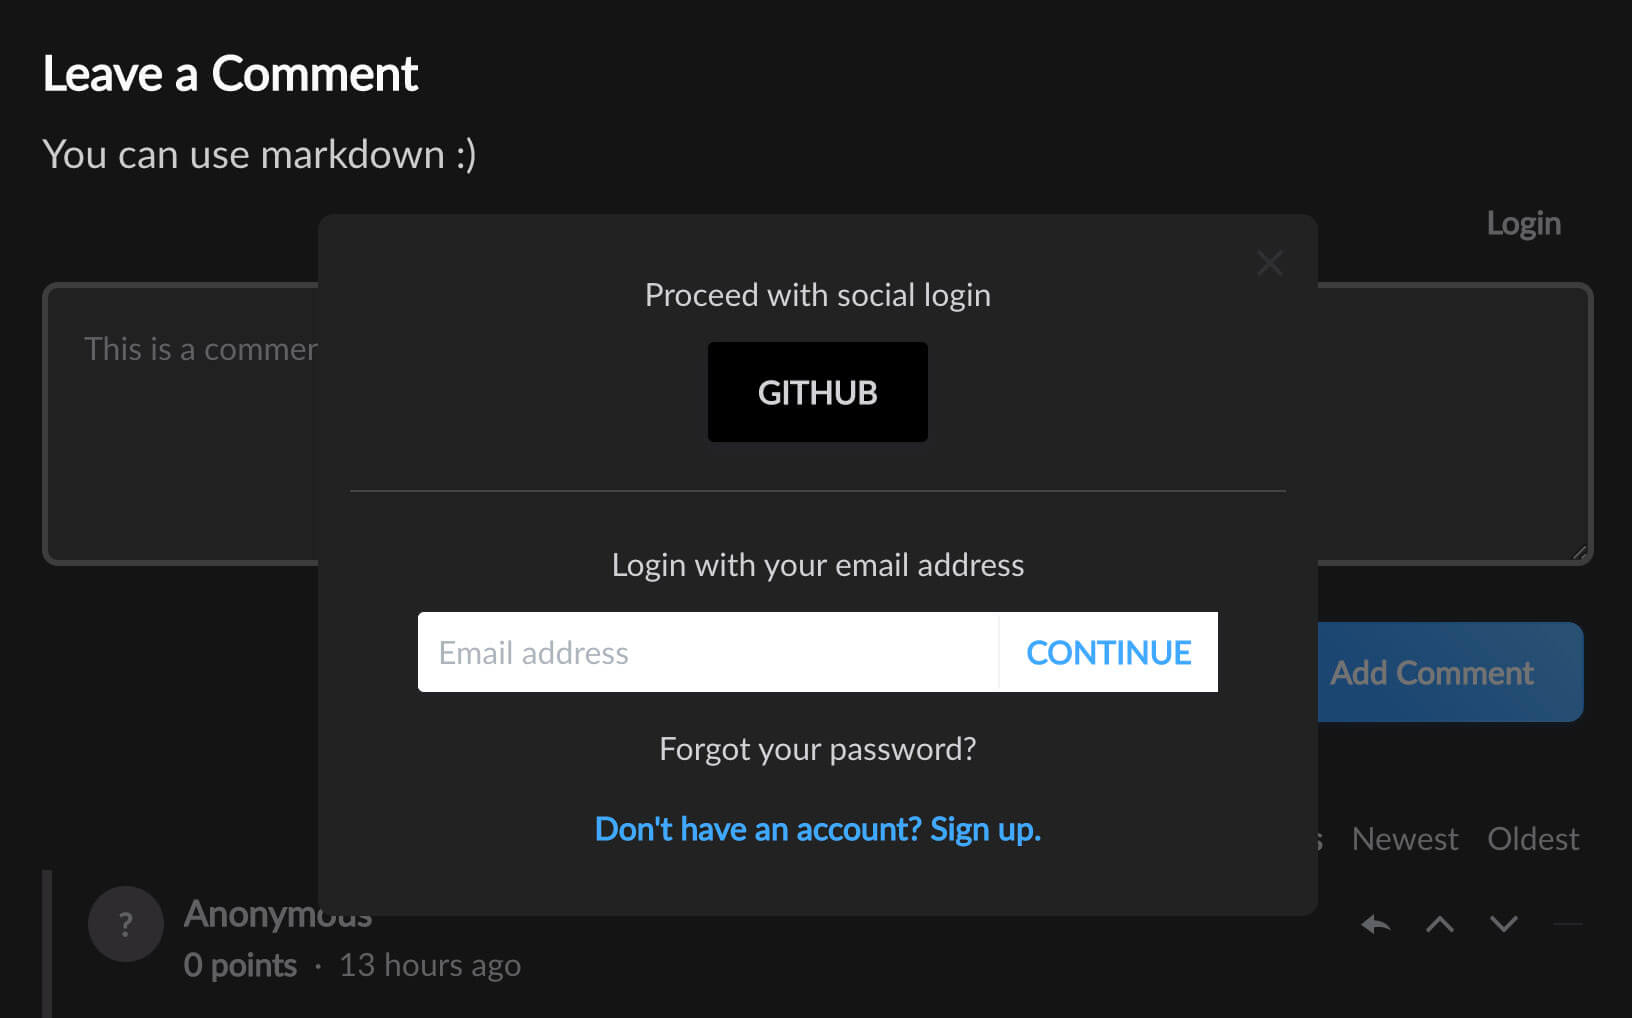
Enable that, and as long as you're logged out of the comments, you'll see the option to authenticate with GitHub when leaving a test comment.
(It will have different colors for you because this has custom CSS, but it works the same way):
Add social login: Twitter
This has two steps:
- Create a Twitter developer account
- Update permissions to allow 3rd party auth
Go to the Twitter Developer Portal and apply for an account. There is no manual approval process so you'll be able to create an app right away after verifying your email address.
Then, you'll see you have a new project with limited permissions, but you will have the keys you need already:
Environment=COMMENTO_TWITTER_KEY=YOUR_CLIENT_ID
Environment=COMMENTO_TWITTER_SECRET=YOUR_CLIENT_SECRET
Again, add this into /etc/systemd/system/commento.service.
Once you're done editing, stop and restart Commento.
sudo systemctl stop commento
sudo systemctl start commento
Now you need to request additional permissions under "Authentication Settings" so people can use Twitter to log into your comments system:
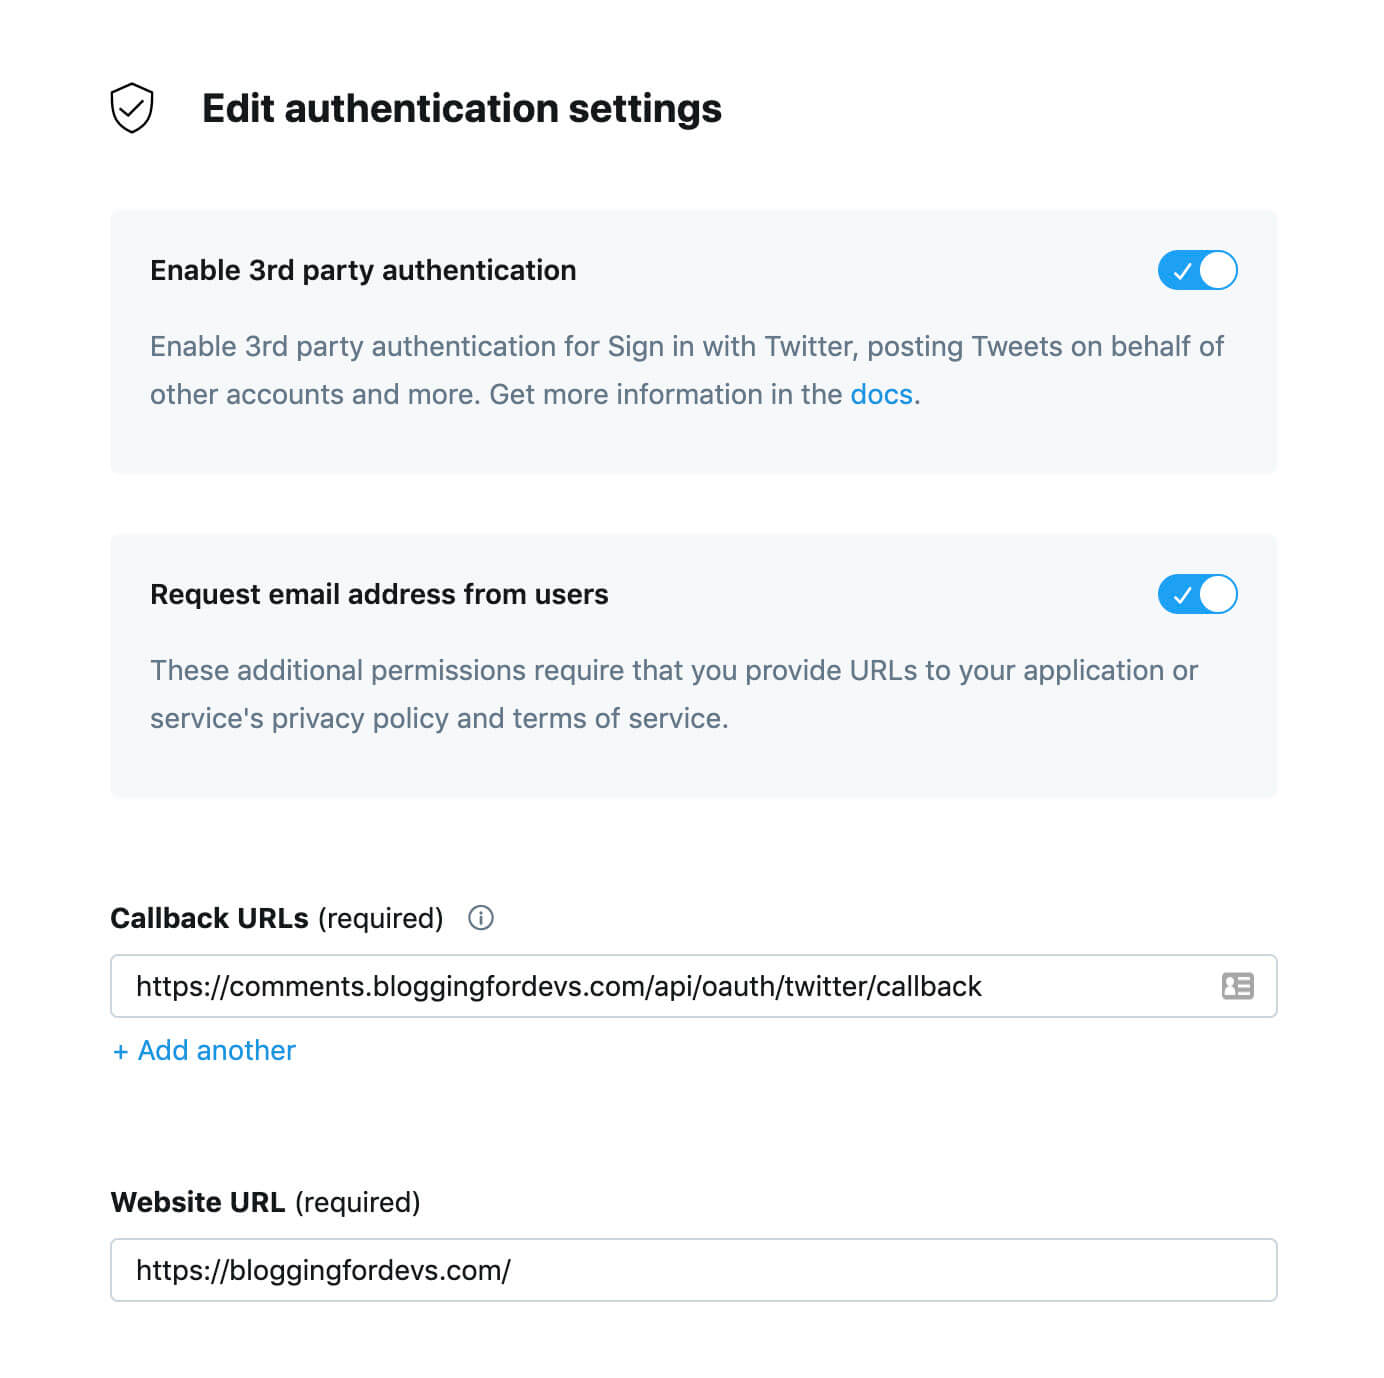
For the Authorization Callback URL, use:
https://comments.YOUR_DOMAIN_NAME.com/api/oauth/twitter/callback
You will need to have terms and conditions and a privacy policy in order to fill out this form.
Finally, go into your Admin panel and enable Twitter as a login method:
Once this checked, you can refresh your blog comments and see Twitter as a login method.

FYI - There is an issue with Twitter images being broken right now, which will hopefully be included in the next release soon. You can read more on Gitlab.
You made it!
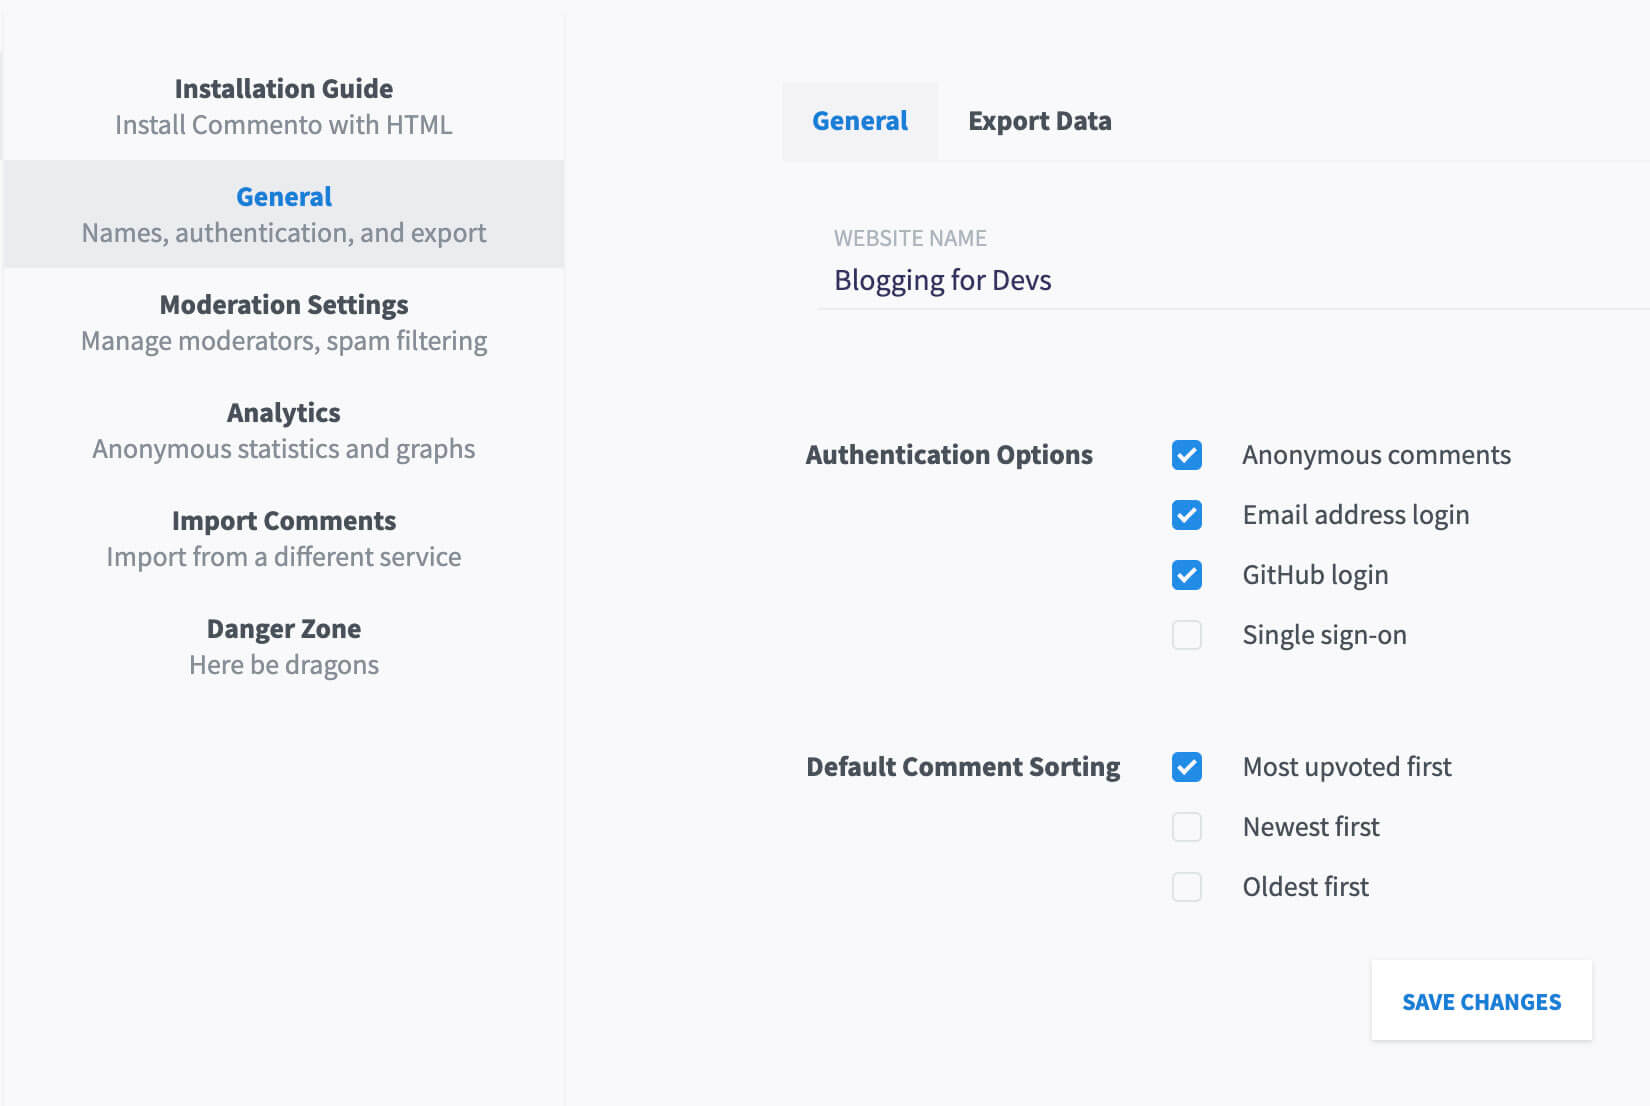
Hopefully you now have comments functioning on your blog. You may wish to customize the CSS, add more login methods, or tweak the settings.
Even though the process was tedious, I still appreciate the fact that this is open-source and has a self-hosted option. There are a lot of tools that will give your static site comments, but not a ton with complete threading, voting, moderation, and not asking you to re-build your website with every comment.
Thanks for reading!
Here are a few additional resources that helped me get the comments up and running, in case I've missed something in my review.
Further resources:
I had to patch together a number of tutorials to make this work, so thanks to each of these sites for their walkthroughs:
- https://docs.commento.io
- https://www.paolotagliaferri.com/add-self-hosted-commento-comments-to-ghost-blog/
- https://itnext.io/adding-commento-to-react-apps-like-gatsby-871824fb57ae
- https://www.jaredwolff.com/how-to-setup-worry-free-blog-comments-in-less-than-20-simple-steps/
- https://blog.maskys.com/installing-self-hosted-commento-onto-your-ghost-blog/
Why do you want comments on your blog? Will you be trying Commento or another solution?
I'd love to hear your thoughts in the comments ;) Or reach out to me on Twitter @monicalent.
You don't have to be Twitter-famous to grow your blog as a developer.
Take the FREE 7-Day Blogging for Devs Email Course and learn how to grow your blog without an existing audience (!) through great writing and SEO.
Learn how to grow your blog as a developer without an existing audience through great writing and SEO.